The Tools Behind My Paintings
- Deanna Stroud
- May 22
- 4 min read
Hello everyone, welcome to my first-ever blog post! I am an artist at heart but that doesn't mean that my artistic skills extend to writing, so I hope you can forgive any errors that are bound to happen.
I often get asked what materials I use to create my oil paintings, so I wanted to share what's currently in my "studio," which is actually just a small corner of my living room that hasn't been taken over by toddler toys... yet.
I'll let you know why I settled on these choices. I'll also share where I was able to save some money and where I had to spend a little more.
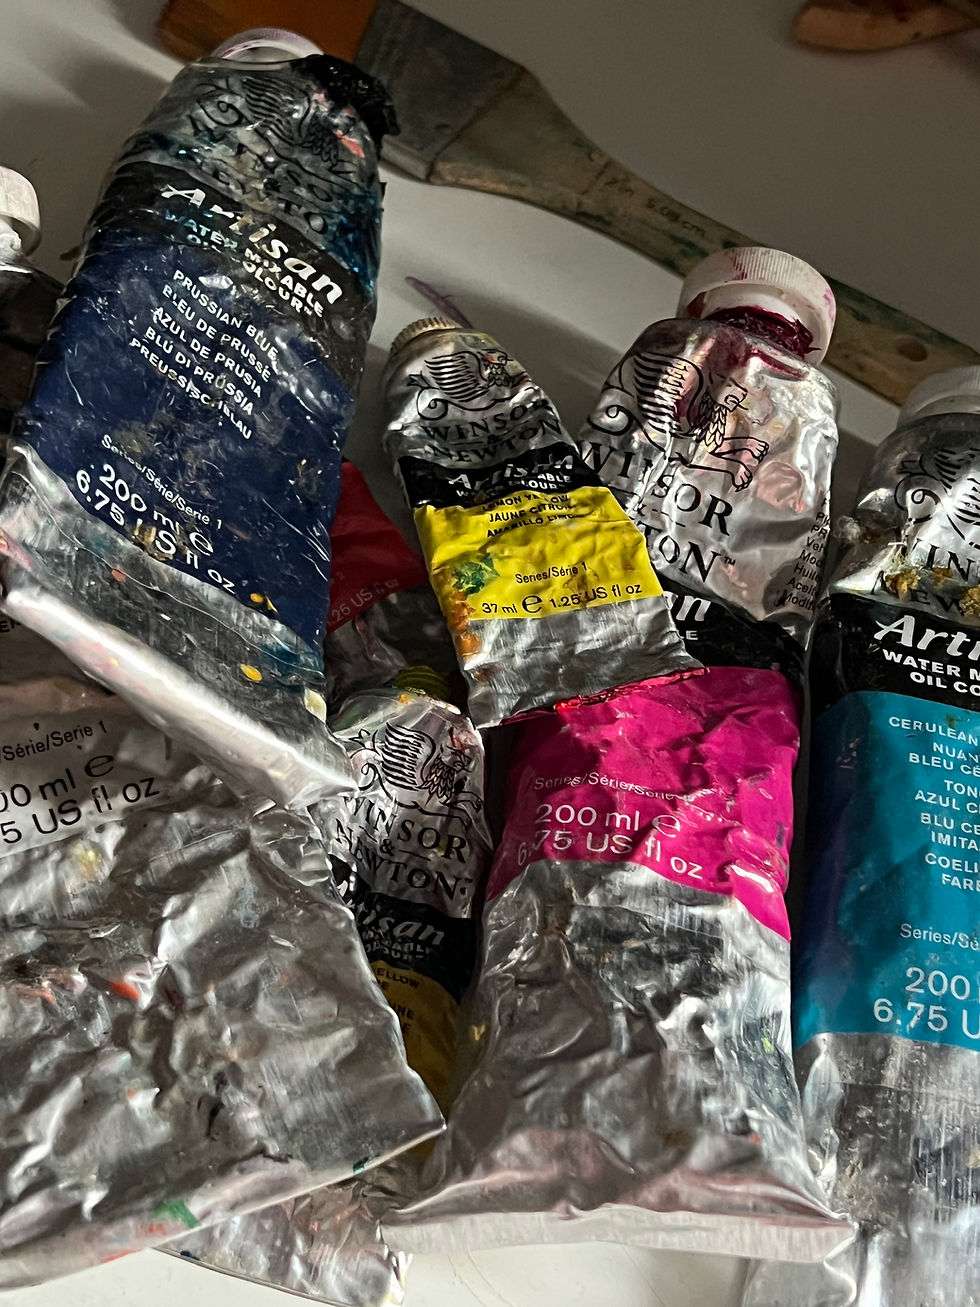
Paints
Lets start with the main character: I use Winsor & Newton water mixable oil paints. These are the absolute BEST! They are way easier to clean than traditional oils which is great because it saves a lot of time and avoids the fumes from turpentine. I love their buttery consistency and the beautiful pigment. I would highly recommend these to anyone just starting out with oils or switching from acrylics to oils. They are a little expensive, but if you spend more money on anything it should be your paint and mediums.
Mediums and Varnish
I used to only thin my paint with linseed oil, but I didn't like the way it would create a slight sheen to my work. I ended up finally trying a fast dry medium from the brand Gamblin. It's called Liquin and I love it! It helps the paint thin out and glide easily without making it extra glossy. On top of that it helps my paint dry faster. Honestly, it was a game changer for me, especially since I tend to paint in layers. So the faster drying time has been truly amazing.


As for varnish, I have always used the same one, Gamblin Gamvar Satin Finish. I like it because it gives a subtle, controlled level of sheen, not too matte and not too glossy. I think you should always varnish your paintings to bring the richness of the colors back. The colors can sometimes sink into the canvas and become a bit dull, especially the darks. Varnish brings them back to life!

Brushes
My brushes are a mix of whatever works and whatever is cheapest! In my opinion, this is where you can save some money. Every time I walk into an art store and see the prices of the higher quality brushes, I die a little inside. So I buy what's on sale or the cheapest packs I can find. Sometimes you can find good deals on Amazon for packs of brushes. Also, another tip: if you are in Canada and shop at Michael's Arts and Crafts store, you can go online and find a 30% off one regular-priced item coupon that you can scan in store at the checkout.
I usually don't invest in expensive brushes because I don't take very good care of them and I don't see that much of a difference in performance compared to cheaper ones. The main thing I have learned is that softness matters more than price. Some brushes like the softer watercolor style ones, don't have enough structure to move the oil paint around properly. But I think those are still okay for very fine details if you use enough medium to thin it out.
I will say, the only brush that I tend to spend more money on is a good one for varnishing.


Easel
I use the most basic easel you can get. It's honestly kind of flimsy. It works fine, but this is one item I hope to upgrade soon! This is an area where you can save money, though, because a really large and expensive easel isn't really needed unless you are doing huge paintings. I can't remember where I got this one but as you can see, it has seen better times.

Palette
You can use anything as a palette. When I first started I used plastic plates, and I have even used recycled cardboard, though I don't recommend that. Right now I am using a beautiful grey glass palette that my sister gave to me as a gift. It's grey so it's easier to see the colors when being mixed. Besides that, I do love a good paper palette, you can get them as a block of paper and when you are done with painting you can rip it off and have a fresh paper underneath. Super easy for clean up.

Final Thoughts
My materials aren't about perfection, they are about finding a balance between performance and practicality. Everything I use is chosen based on how it affects layering, drying time, and my wallet. I don't think there is one "correct" way to set up for oil painting. This is just what currently works for me in my small space. What's most important is that you paint! Make time for what you love and let your creativity flow.
See you in the next Studio Journal,
Deanna
Comments